The Ultimate Test Sieve Guide You Wish You Had
Particle size analysis is a form of quality control that has helped yield accurate insight into a product's individual paerticles for centuries. As the foundation of the practice, test sieves remain one of the most widely used tools, becoming more durable and reliable over time. This guide will educate you on everything you need to know about test sieves and help you better understand how they can benefit your process.
Don’t Have Time to Read the Entire Guide Now?
Fill out the form for a downloadable PDF version of the guide you can reference later. (Don't forget, you can keep scrolling to read without giving us your email!)
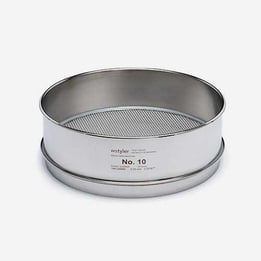
A test sieve is a particle analysis instrument that employs a woven wire mesh screen, consisting of uniform pore openings, that is mounted onto a frame. It is designed to separate the particles that make up a sample of material and identify the particle size distribution.
As they have been used for centuries, there are industry standards that dictate the sieve types and specifications you should use.
What Components Make Up a Test Sieve?
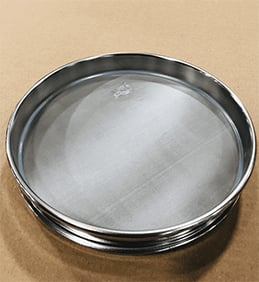
Most test sieves are constructed from a frame, a skirt, and some sort of screen. The frame is designed to provide space between sieves when stacked, which allows the particles to be distributed evenly.
Now, test sieves are generally available in 3-inch, 8-inch, or 12-inch variants in the United States. This is equivalent to 100 millimeters, 200 millimeters, and 300 millimeters internationally.
The skirt of a sieve serves as a supportive element that prevents them from moving erratically when conducting a test sieve analysis.
Finally, the screen serves as a filter that separates the particles based on their size. This gives you insight into the quality of the material on your production line.
Stainless steel woven wire mesh is most widely used as it has a screening range of 4" (100mm) to 635 mesh (20um), while providing maximum durability. That said, perforated plate is another screening media that is commonly used.
NOTE: Test sieve cloth is woven differently than other mesh products. The loom must be monitored closely to ensure the mesh openings are exact and comply with the tolerances set by ASTM or ISO.
How Are Test Sieves Made?
Typically, the materials that are used to assemble our test sieves are produced and stored within the facility. This allows us to have complete control of the construction process and ship orders promptly.
To that end, the assembly process of a test sieve goes as followed:
- To form a frame, a coil of stainless steel is placed into a stamping machine that punches out blanks that correlate with the sieve's diameter size.
- The blanks are then drawn, creating the cylindrical shape of the frame. NOTE: To eliminate sharp edges, the lip of the frame is curled over.
- The skirt is then stamped from raw material, similar to the frame.
- At this point, the test sieve mesh is tensioned so that it is drum-tight, while also being soldered to the skirt's top edge.
- Once this is complete, the frame is placed on top of the skirt and locked into place.
- A bead of epoxy is then applied around the inside seam where the mesh meets the frame. This is done to prevent particles from wedging in the seam and skewing your particle distribution results.
- The assembled sieve is then placed into an oven to cure
- Once cured, it receives a final buffing.
- The test sieve then undertakes an inspection to verify the final product, making sure there are no flaws that may have occurred during production.
- Using a laser etching, the test sieve's serial number is permanently engraved into the outside of the frame. This is vital as the serial number provides insight into the year the sieve was made, the week of the year it was marked, as well as what machine marked it.
NOTE: Test sieves are not sterilized during or after the assembly process. This means that heavily regulated materials, such as food and pharmaceutical samples, should not be reintroduced into production after testing.
How Do Test Sieves Work?
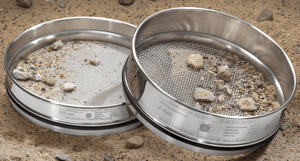
Test sieves are used to conduct test size analysis in a wide range of industries. When it comes to how they work, think of the process used to pan for gold.
As the pan is shaken, the small particles of dirt fall through the screening media, leaving the larger gold particles behind. This function is exactly how test sieves are used to test a representative sample's particle size and ensure a specific level of quality is met.
A sieve shaker is a particle analysis instrument that is employed to agitate your test sieve stack and promote particle movement. That said, hand sieving can be used to create the same level of agitation.
Dry vs Wet Test Sieves
In the world of test sieves, there are two general variations of sieves: dry test sieves and wet wash test sieves.
Dry test sieves are designed to test dry, free-flowing particles that can move through the sieve with a simple shaking or tapping motion. Wet test sieves are designed to test particles that require the presence of water to pass through your sieve(s) properly.
Wet test sieves are popular in the aggregate industry, as clay and silt tend to adhere to aggregate and make the particles have a larger profile than they actually have. Water rids the particles of this dirt and silt, allowing for an accurate test.
To learn more about wet and dry test sieve analysis, take a moment and review our article: Wet & Dry Sieve Analysis (Alloys, Certification & Sizes).
Five factors influence the overall cost of a test sieve. These factors include the type, alloy, mesh size, sieve size, and certification.
Types of Sieves
Dry Test Sieves
Dry test sieves are generally what are used to conduct a test sieve analysis (see below). They have the frame, skirt, and wire mesh screen profile that was discussed above.
Lab technicians can use them individually during a hand sieve analysis or in a sieve stack that is placed in a sieve shaker.

Wet Test Sieves
As these test sieves are designed to be used for wet sieve analysis, they are constructed using a deeper frame profile. Having said that, they utilize the same wire mesh screening media as dry sieves.
Frame Diameter
The frame diameter is used to describe the overall size of a sieve. Typically, 3-inch, 8-inch, and 12-inch are the standard sizes for sieves and are relatively inexpensive compared to "specialty" sieves. To that end, sieve frames also come in 6-inch, 10-inch, and 18-inch, 200mm, and 300mm diameters.
NOTE: Standard sizes are cheaper as they are made in surplus and stocked, making them more affordable to produce.
Sieve Height
When it comes to sieve height, you can get them at full-height or half-height. Half-height sieves are typically used to accommodate sieve stacks that have a larger number of sieves.
A good rule of thumb to follow is: the taller the sieve; the more expensive the sieve will be. This is because taller sieves require more material to be created.
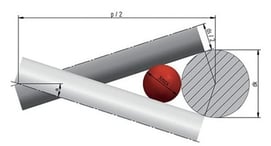
Mesh Size
Standing as the most critical element of a test sieve, the mesh size you choose will have the most significant impact on the price of your sieves. Sieve mesh, in particular, is available with a mesh opening range of 4 inches down to 20 micron.
That said, the finer the mesh gets, the more expensive it will be.
Looking at the wire themselves, fine wires take a longer time to draw as the wire supplier must be delicate with finer wires. When being woven, fine wire takes longer to be threaded through the weaving loom, and the loom must be run much slower.
In other words, the production of fine mesh is very labor-intensive. To that end, when the openings exceed 4 inches, perforated plate should be used.
Regardless, the mesh you should use is illustrated and determined in your industry standards.
Sieve Alloy
Stainless steel is the preferred alloy to use for test sieve fabrication, as it is more durable and cost-effective.
Brass test sieves (containing a brass frame and brass mesh) are only recommended when testing materials that can spark. Stainless steel sieves (with both the frame and mesh being made of stainless steel) must be used for pharmaceutical and food applications.
But they are also ideal for testing abrasive materials as brass is much softer than stainless steel and is more likely to be damaged.
Cost Ranges and Examples
To put the impact these factors have into perspective, let's say you need an 8-inch test sieve, as it is the most commonly used size. The price variations you could expect would be:
U.S. Standard #80 mesh and coarser
Cost: $60 - $70
U.S. Standard: #100 mesh - 200 mesh
Cost: $60.00 - $80.00
U.S. Standard #230 mesh - #635 mesh
Cost: $90 - $515.00
If you would like more information regarding test sieve pricing, refer to the following article:
How Much Does a Test Sieve Cost? (Factors and Price Ranges + Video)
What Is the Standard Metric and U.S. Sieve Cloth Table?

The standard metric and U.S. sieve cloth table is a guide that is used to universally convert the mesh opening of a given sieve to a designated ASTM or ISO mesh size. It converts to the ASTM and ISO standards specifically because these are the two most widely used standards in the particle analysis industry.
It was designed to help lab technicians accurately convert these standards with ease.
For example, if you require a 1mm test sieve but the test sieve supplier only offers #18 sieves and sieves with a .0394-inch mesh opening, the conversion table would help you identify that each option would provide the same level of screening.
How the Standard Metric and U.S. Sieve Cloth Table Helps Design the Perfect Mesh
The ASTM/ISO standards both guide the majority of wire mesh production operations throughout the world. This means companies are sometimes not familiar with mesh specifications that are outside these two sets of criteria.
But what if a customer requests a unique specification?
Well, let's say a customer requests a U.S. #43 test sieve. This specification is outside the standard U.S. #40 mesh and a U.S. #45 mesh that follows ASTM standards, as well as the 400-micron mesh that follows ISO standards and falls between U.S. #45 and U.S. #40.
The standard metric and U.S. sieve cloth conversion table would be used to help identify a mesh count that is the closest to the mesh size the customer needs.
Why Have Different Measurement Standards?
Standard designations vary throughout the world simply because there are different unit measurements used. ISO standards, for instance, represent the metric system that is popular across the globe, while ASTM standards represent the American imperial system.
Having these different measurement standards allow lab technicians to communicate with other technicians in their industry no matter what measurement unit they use to regulate their operation.
How Does the Price of ASTM and ISO Specifications Convert?
When it comes to the price difference between ASTM- and ISO-regulated wire mesh, there is no difference. In other words, an 8-inch, full-height, U.S. #10 test sieve will cost the same as its ISO-regulated counterpart.
Lead times between ASTM- and ISO-regulated mesh, however, do vary. This is because ASTM-labeled sieves are generally in higher demand thus more readily available.
How to Prepare for a Test Sieve Analysis?
Prior to conducting a test sieve analysis, you must first gather a representative sample. For best results, use the techniques and methods described previously.

The next step in the preparation process would be to prepare your sieve(s) following your set industry standards. This step is mainly to ensure you have all the right mesh opening sizes in the right place, as different materials require different sets of sieves to obtain an even distribution of particles.
You will finally want to calculate how long you must sieve your material, especially when using a sieve shaker. A typical sieve analysis test takes around 10 to 15 minutes.
How to Perform a Hand Sieve Analysis
Hand sieving is a sieve analysis technique that can be performed using a single sieve or, less commonly, with a small sieve stack. Before you begin hand sieving, you must ensure that all debris from previous testing has been removed from every sieve being used.
You can then gather your representative sample and begin testing using the following steps as a guide:
- Pour your sample material onto your sieve surface
- Rotate the sieve with one hand, gently tapping the side of the frame with the other hand, until most of the finer material has passed through into the pan. This typically takes 1 – 4 minutes to complete. You can either perform this with the sieve level or at an angle, depending on your material.
If your test specifically requires the use of a test sieve stack, stack them with the coarsest sieve at the top and gradually move down the stack until the finest sieve is on the pan. Use the following steps as a guide:
- Rotate and gently tap the sieves for approximately 3 minutes
- Each sieve should then be processed separately, adding any additional material that passes through to the sieve below it.
- This should be repeated until you get to the finest sieve to the pan.
NOTE: Hand sieving with a stack of sieves is most easily performed by placing the sieve stack on a table.
You may choose to hand sieve over a collection pan if retention percentage is critical to your results. If collecting the "pass-through' material isn't a concern, you can sieve over the ground when testing in the field.
Regardless of how you conduct your hand sieve analysis, you must always remember that consistency is key.
You and any lab technician contributing to the analysis process should try to be as consistent as possible when tapping and rotating your sieves during a sieve analysis. This will help to ensure your team is yielding reliable results.
To help, a solidified hand sieving procedure should be recorded and implemented throughout your lab. To that end, you can also integrate a mechanical sieve shaker to help facilitate both dry and wet sieve analysis for more consistent, repeatable results.
Analyzing Your Results
After you conduct your analysis, the next step is to weigh the amount of retained material on each sieve used in order to begin calculating the results of the test. If done correctly, the individual weights will be equivalent to the weight of your initial representative sample.

To that end, calculating the percentage of particles that passed through the sieve(s) is the most widely used technique for obtaining results. This calculation is achievable by figuring out how many particles passed through the top sieve, recording the percentage, and repeating this process for every sieve used during the analysis.
For enhanced efficiency, specialized software can be used to process your results. When using the software, the retained weight is entered, at which point you are provided with both the percentage weight retained and a particle distribution curve.
If you are interested in particle analysis result processing software, W.S. Tyler offers a program for $30.
ASTM
Regarded as one of the largest regulating organizations within the particle analysis industry, ASTM oversees the standards encompassing the material, products, systems, and services you integrate into your particle analysis operation. The organization itself consists of hundreds of producers, users, consumers, government, and academia that span across over 140 years.
These volunteer members are responsible for creating technical documents that lay the foundation for the manufacturing, management, procurement, codes, and regulations that are employed throughout the particle analysis industry today. ASTM is often listed within other Standards as a supportive document.
ASTM E11
The ASTM E11 is a standard that oversees the production of test sieves, specifically the mesh openings, wire diameters, frame size, and cloth mounting employed. This standard was developed to ensure that any given ASTM compliant test sieve produces accurate and repeatable results no matter the industry.
International Organization for Standardization (ISO)
Sharing similar qualities as the U.S. ASTM, the International Organization for Standardization (ISO) has published 22,701 international standards and related documents, covering industries from technology to agriculture. Both ISO and ASTM standards rely on expert collaboration to generate voluntary, consensus-based, market-relevant international standards that facilitate the innovation needed to overcome the obstacles seen throughout the particle analysis industry.
In terms of test sieve production, the ISO 3310-1:2016 standard regulates the mesh size, construction materials, and tolerances used to construct a test sieve.
American Association of State Highway and Transportation Officials (AASHTO)
The American Association of State Highway and Transportation Officials (AASHTO) is the international organization responsible for setting the technical standards that control highway system production at all stages. More specifically, the design, construction, materials, and all technical details implemented during the development of highways and bridges.
AASHTO is also responsible for setting guidelines that encompass sieve sizes and material testing requirements to create a sense of uniformity in all asphalt, cement, and concrete used to construct U.S. road systems.
American Petroleum Institute (API)

The American Petroleum Institute is responsible for setting the standards that oversee the natural gas and oil industry. They specifically created standards that control the use of silica sand during hydraulic fracturing, or fracking, in efforts to maintain uniform size and shape, including sphericity and circularity, throughout the industry.
The API also helps to guide the industry's use of test sieves to regulate the various particle size distributions of each grade of sand.
What if I Don’t Have a Standard for My Material?
Occasionally, there are situations in which a specific material does not have any set standards associated with it. If the overall particle size of this material is known, the efficiency of your test sieve analysis can be calculated using test sieves, both above and below the nominal size, that are compliant with ASTM E11 standards.
Once the particles reach an ideal consistency, you can then begin to check the quality of future production lines using test sieves. For more information about testing unregulated material, refer to the websites of the various organizations and search for materials with identical characteristics.
1. Regular Visual Inspections
Visually inspecting your sieves is an easy technique that can help you identify any wear and tear that may hinder the accuracy of your results. It is recommended that you form and execute a regular inspection schedule that compliments that amount in which your sieves are used.
When inspecting your mesh, you should be watching for dents in the screening media, scratches in the screening media, and any cracks in the epoxy.
Dents in the Mesh
Hold your sieve up to a reliable lighting source and examine to see if the wire mesh screen is still drum-tight. If any dents are identified, the test sieve should be taken out of any testing procedures.
These dents are likely to cause the integrity of the mesh openings to be compromised, which is one of the leading causes of false analysis results.
Scratches in the Mesh
Using the same methods and ideology with dents, you should examine your sieves to identify any scratches in the mesh. Scratches often turn into rips and tears, which will render your results unusable.
The best way to ensure accurate and repeatable results is to replace the sieve if the scratch is prominent.
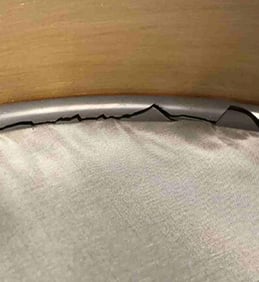
Cracks in the Epoxy
Test sieve epoxy is an adhesive used to connect the mesh screen to the skirt of the sieve. This epoxy is exceptionally rigid and can withstand even the harshest materials such as aggregate.
As with all lab equipment, the epoxy is subject to the wear and tear that causes faults. This is why you should regularly check for any cracks along the epoxy seal.
Neglecting to identify cracks in the sieve may allow particles that usually get stopped at a particular mesh size to pass, resulting in false sieve results.
2. Sieving Correctly
Ensuring that you are using your test sieves properly is an easy step to keeping your sieves in pristine condition. If you or any of the lab technicians are doing things such as forcing particles through the sieve by pushing them, you run the risk of pulling the mesh from the frame/skirt.
Another common mistake is not using the correct sieve size to sample weight ratio, which was discussed above. This often causes blinding, which is when particles become logged in the mesh openings, clogging them and preventing any other particles from passing.
In some cases, the particles become stuck permanently, and the sieve must be replaced to ensure accurate and repeatable results.
3. Cleaning Your Sieves
Keeping your sieves clean and free of any debris from past testing is one of the most critical steps in achieving reliable results. To clean your sieves properly, follow these five easy steps:
- Flip the test sieve over, placing it over a receiving pan
- Gently brush the underside of the mesh using a circular motion
- Gently tap the sieve frame with the brush handle to remove any particles that may cling to the frame
- If necessary, wash the sieve in warm water and a mild detergent solution
- Allow adequate time for the sieve to dry before using
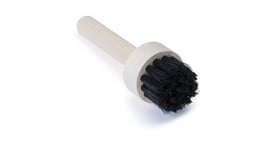
Brushes
There are several brushes on the market that were specifically designed to clean test sieves. These brushes employ bristles (commonly brass or nylon) that will allow you to clear the mesh openings of any debris without damaging the mesh.
When cleaning more delicate mesh screens, a nylon brush should be used as brass bristles will likely damage the mesh. When cleaning larger mesh openings, however, brass brushes can be used as the thicker wire diameter of the mesh can withstand the heavy-duty qualities of the brass bristles.

Ultrasonic Cleaners
There are some mesh opening sizes that can prove difficult to clean, as they are too fine for the bristles to reach the opening properly. Ultrasonic sieve cleaners were designed to combat this as it uses ultrasonic vibrations to dislodge particles from the finest of mesh openings.
To learn more about ultrasonic sieve cleaners, refer to the article: What Is an Ultrasonic Sieve Cleaner? (Definition, Cost, and Upkeep).
Important Don’ts
There are a few things that you should avoid when cleaning your sieves. The five don'ts are:
- Don't use a dishwasher to clean or an oven to dry your test sieves. This can damage the sieves.
- Don't use pressurized air to clean your sieves. This can damage the mesh.
- Don't force particles through the openings with a brush or your hands when cleaning.
- Don't use acidic solutions to clean the sieves.
- Don't try to repair faulty sieves.
4. Storing Your Sieves
How you store your sieves is critical to keeping the different components of the sieves in tip-top shape. For maximum longevity, it is recommended that you store your sieves in a clean, controlled environment that is away from moisture.
Test sieves should also be stored in areas where dramatic temperature variations are not present. Extreme temperature shifts may cause damage to the sieve, specifically the epoxy.
5. Recertifying Your Sieves
As you continue to use your test sieves, you will want to ensure you continue to yield accurate results that comply with your industry standards. The best way to do so is to have your test sieves certified/recertified.
Test sieve certification is a means of stating or verifying that any given sieve meets or exceeds written standards. It assures that the sieve was assembled to perform at a specified level of performance.
During the certification process, the sieve is first visually examined to identify any tears, wrinkled mesh, or cracks in the epoxy. The sieve is then scanned using a specialized microscope that analyzes the mesh openings to ensure no stretched or clogged openings are present.
The wire diameter is also verified during this examination.
Once the sieve is confirmed to have met the required certification level, it is shipped back to your facility with a document that verifies the sieve's technical information. To that end, if your sieve does not pass, you will be informed, and the next step would be to purchase a replacement sieve.
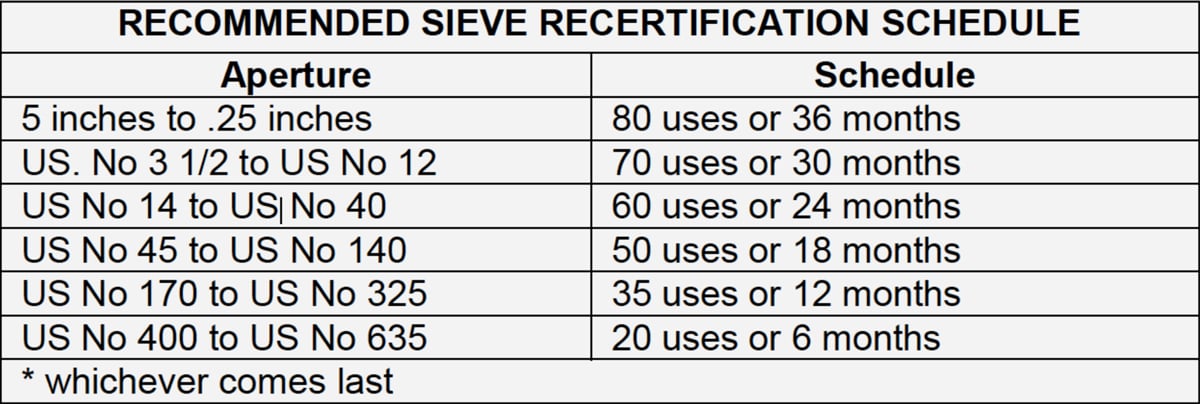
To help make sure you keep up with your sieve's certification, use the following schedule as a guide: